 Skip to content
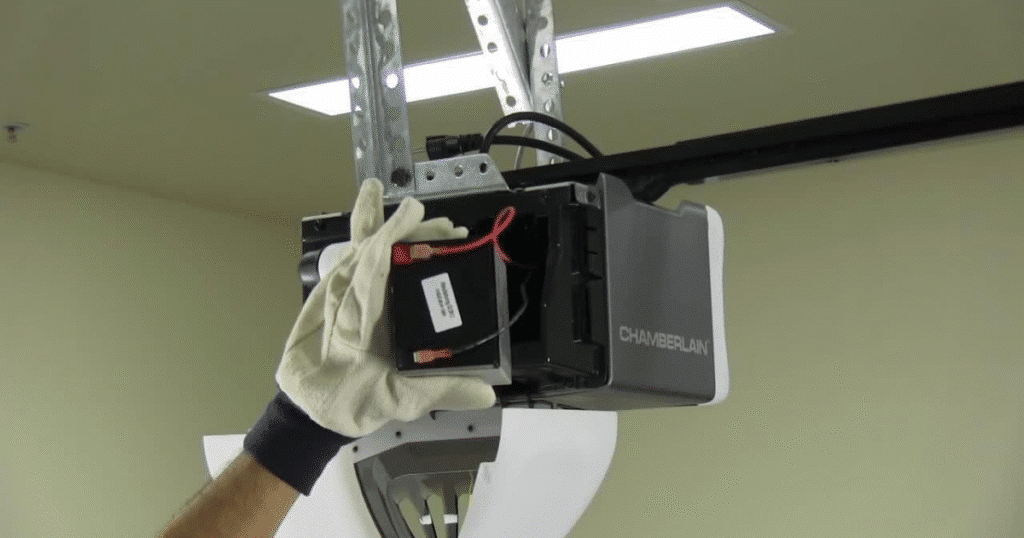
Want to avoid getting locked out because of a dead remote? Discover how to replace garage door opener battery quickly and safely with this expert guide.
Your garage door opener is a convenience you rely on daily. When the remote or wall unit stops working unexpectedly, it can be frustrating, especially when you’re in a rush. A depleted battery is one of the most common causes of garage door opener failure.
Fortunately, this issue is easily fixable if you correctly replace the garage door opener battery. A simple battery swap can restore full functionality to your garage system and save you from unnecessary panic or service calls.
In this guide, we explain everything you need to know to get your opener back in working order. Whether using a remote, wall control unit, or backup battery system, we’ll help you handle it step-by-step with clarity and confidence.
Know When It’s Time: Signs Your Opener Battery Needs Replacing
Garage door openers don’t just stop working for no reason. Here are some common indicators your battery needs to be replaced:
1. Slow Response from the Remote or Keypad
If you press the button with a noticeable delay before the door starts moving, your opener could struggle to receive a strong enough signal. A sluggish response is often one of the first signs that your battery is running low.
2. Decreased Remote Range
You used to open the garage door from the end of your driveway, but now you must be right in front of it. That shrinking range is another sign the battery doesn’t have enough power to transmit a signal over a longer distance.
3. Flashing Lights or Beeping from the Opener Unit
Most modern garage door openers have built-in alerts to let you know when something’s wrong. If your unit starts beeping or flashing lights unexpectedly, it may be trying to tell you the battery needs attention. These warning indicators are easy to overlook, so it’s a good idea to check your owner’s manual to know what different signals mean.
4. Inconsistent Operation or Intermittent Failure
If your garage door opens one day and not the next—or only closes halfway before reversing—don’t immediately assume it’s a major malfunction. Weak batteries can cause unpredictable behavior as the opener struggles to complete a full cycle on limited power.
5. Total Failure to Open or Close
When the battery is completely drained, your garage door opener may not respond. If everything seems fine mechanically and electrically, the issue may be as simple as a dead battery in the remote or backup system.
If you notice any of these issues, it’s likely time to replace the battery. Regular replacement keeps your opener reliable and ready when you need it.

Gather the Essentials Before You Start
Before replacing the battery, check your garage door opener manual to determine the correct battery type. Most remotes use CR2032 coin cell or 9V batteries, while backup systems may use 12V or rechargeable options. Here’s what you’ll typically need:
The correct replacement battery (based on your opener’s model)
- A small screwdriver – usually Phillips or flathead, depending on the battery compartment
- A clean cloth – helpful in wiping away dust or corrosion inside the compartment
- A step ladder – essential if you’re accessing a ceiling-mounted motor unit
- Protective gloves (optional) – for extra grip and safety when handling tools or batteries
Always work in a dry, well-lit area to reduce the risk of slips or electrical mishaps. If you’re replacing a battery in the motor unit or backup system, disconnect the power to the opener first to avoid accidental operation.
Being prepared not only speeds up battery replacement, but it also helps prevent damage to your device and keeps you safe while you work. A few minutes of prep now can save you time and hassle later.
Step-by-Step: How to Replace Garage Door Opener Battery Without Mistakes
1. Identify Which Battery Needs Replacement
First, determine which component is causing the issue. Your system may include:
- A remote control, typically using coin-cell or AA/AAA batteries.
- A wall-mounted control unit, which may contain a small internal battery.
- A motor unit backup battery is used to operate the door during power outages.
If the wall unit still functions but the remote doesn’t, the problem is likely in the remote. The backup battery could be dead if nothing works and there’s no external power. Carefully inspect each part and refer to your opener’s manual if needed.
2. Open the Battery Compartment
Once you’ve identified the faulty unit, locate and open the battery compartment:
- Remotes may slide open or have a pry slot for a small screwdriver.
- Wall units usually have a cover secured with screws or clips.
- Motor units may require removing a panel on the top or side—be sure to unplug the opener before opening it.
Handle components with care to avoid damaging plastic clips or delicate internal parts.
3. Remove the Old Battery
Before taking the battery out, observe its orientation—note where the + and – symbols are. Taking a photo can be helpful for reference.
Gently remove the battery. If you see dust or corrosion, clean the compartment using a dry cloth or a cotton swab moistened with rubbing alcohol or vinegar. Make sure everything is dehydrated before inserting the new battery.
4. Insert the New Battery
Place the new battery in the same orientation as the old one, ensuring the + and – terminals match the compartment markings. Press it in gently but firmly so that it fits snugly.
Once the battery is in place, close the compartment securely. If there are screws, tighten them just enough to hold the cover without cracking the casing.
5. Test the Opener
After closing everything up, press the button on the device to confirm that the battery replacement was successful:
- If you’re using the remote, test it near the new garage door.
- Press the button to open or close the door if it’s the wall unit.
- If you replaced the motor backup battery, unplug the unit from power to make sure it works on battery power.
If it doesn’t respond, double-check the orientation of the battery, and consider trying a second new battery in case the first was defective.
Extra Tips to Extend Battery Life and Improve Opener Performance
Replacing the battery is simple, but proper care extends the life of your device:
- Store remotes in moderate temperatures
- Use fresh, high-quality batteries from trusted brands
- Avoid pressing the remote buttons unnecessarily
- Check battery life every 6 to 12 months, depending on usage
Being proactive helps you avoid failure during inconvenient times. If your garage opener supports app control, set a reminder to check or replace the battery regularly.
When Battery Replacement Doesn’t Solve the Problem
Sometimes, the issue goes beyond the battery. If you’ve replaced the battery and your opener still isn’t working, it might be due to:
- Worn-out remote
- Faulty wall unit wiring
- Failed circuit board in the motor
- Misaligned sensors or door track issues
In these cases, professional service may be required. A technician can inspect your system and determine if you need a garage door opener repair or complete opener replacement.

FAQs About How to Replace Garage Door Opener Battery
What kind of battery does a garage door opener remote use?
Most use CR2032 or CR2025 coin cell batteries, though some older models use 9V batteries. Check your remote’s model for specifics.
How often should I replace my garage door opener battery?
Typically, every 1 to 2 years or as soon as you notice decreased performance.
Do I need to reprogram my remote after replacing the battery?
In most cases, no. If the remote doesn’t work after battery replacement, try reprogramming it according to your model’s manual.
Is it safe to replace the battery myself?
Yes, replacing the battery is safe and simple if you follow basic precautions and use the correct tools.
Why is my garage door still not working after changing the battery?
It could be a sign of deeper issues such as faulty wiring, worn-out hardware, or a failing opener unit. A professional inspection is recommended.
Conclusion
Learning how to replace garage door opener batteries ensures you avoid the stress of being locked out or dealing with an unresponsive opener. It’s one of the easiest maintenance tasks homeowners can perform and takes just a few minutes with the right tools.
Regular battery checks and timely replacement can improve performance, increase convenience, and extend the life of your new garage door system. Keeping spare batteries on hand can save you in an emergency.
For more complex garage door problems or if you suspect your issue goes beyond a dead battery, trust the professionals at Family Prestige Garage Doors in Alexandria, VA. We offer fast and reliable service to your home’s needs.
End Note
Family Prestige Garage Doors delivers expert service and dependable solutions for homeowners needing opener support. We specialize in quick diagnostics and efficient garage door opener repair so your door functions like new.
Our team understands that not all openers are the same. With years of hands-on experience, we provide thoughtful recommendations and reliable opener replacements based on the size of your garage, frequency of use, and tech features like smartphone connectivity or noise reduction.
Explore more about us, view our gallery, and check our blog for ongoing tips and maintenance advice. Need help today? We serve a wide range of service areas and even offer easy financing options. For immediate support, contact us or visit our Facebook page.


